ShopDreamUp AI ArtDreamUp
Deviation Actions


Suggested Deviants


Suggested Collections


You Might Like…


![[TR] 3D Max: Basic modelling](https://images-wixmp-ed30a86b8c4ca887773594c2.wixmp.com/f/45f5d223-e63d-4dce-a8ed-201b92c1f6b6/d5m1wf8-c1c7742b-89de-47e1-9b4f-f24b0c39b909.png/v1/crop/w_184,h_184,x_0,y_359,scl_0.184,q_70,strp/_tr__3d_max__basic_modelling_by_cobbaltco_d5m1wf8-92s-2x.jpg?token=eyJ0eXAiOiJKV1QiLCJhbGciOiJIUzI1NiJ9.eyJzdWIiOiJ1cm46YXBwOjdlMGQxODg5ODIyNjQzNzNhNWYwZDQxNWVhMGQyNmUwIiwiaXNzIjoidXJuOmFwcDo3ZTBkMTg4OTgyMjY0MzczYTVmMGQ0MTVlYTBkMjZlMCIsIm9iaiI6W1t7ImhlaWdodCI6Ijw9NzkyMCIsInBhdGgiOiJcL2ZcLzQ1ZjVkMjIzLWU2M2QtNGRjZS1hOGVkLTIwMWI5MmMxZjZiNlwvZDVtMXdmOC1jMWM3NzQyYi04OWRlLTQ3ZTEtOWI0Zi1mMjRiMGMzOWI5MDkucG5nIiwid2lkdGgiOiI8PTkwMCJ9XV0sImF1ZCI6WyJ1cm46c2VydmljZTppbWFnZS5vcGVyYXRpb25zIl19.xAmktVgvBrWvoo9A4MoYIal8Ir1z9hAStZK3zg4TfrU)
![[TR] 3D Max: Basic modelling](https://images-wixmp-ed30a86b8c4ca887773594c2.wixmp.com/f/45f5d223-e63d-4dce-a8ed-201b92c1f6b6/d5m1wf8-c1c7742b-89de-47e1-9b4f-f24b0c39b909.png/v1/crop/w_92,h_92,x_0,y_179,scl_0.092,q_70,strp/_tr__3d_max__basic_modelling_by_cobbaltco_d5m1wf8-92s.jpg?token=eyJ0eXAiOiJKV1QiLCJhbGciOiJIUzI1NiJ9.eyJzdWIiOiJ1cm46YXBwOjdlMGQxODg5ODIyNjQzNzNhNWYwZDQxNWVhMGQyNmUwIiwiaXNzIjoidXJuOmFwcDo3ZTBkMTg4OTgyMjY0MzczYTVmMGQ0MTVlYTBkMjZlMCIsIm9iaiI6W1t7ImhlaWdodCI6Ijw9NzkyMCIsInBhdGgiOiJcL2ZcLzQ1ZjVkMjIzLWU2M2QtNGRjZS1hOGVkLTIwMWI5MmMxZjZiNlwvZDVtMXdmOC1jMWM3NzQyYi04OWRlLTQ3ZTEtOWI0Zi1mMjRiMGMzOWI5MDkucG5nIiwid2lkdGgiOiI8PTkwMCJ9XV0sImF1ZCI6WyJ1cm46c2VydmljZTppbWFnZS5vcGVyYXRpb25zIl19.xAmktVgvBrWvoo9A4MoYIal8Ir1z9hAStZK3zg4TfrU)


Featured in Groups


Description
Part [1] :origin()/pre14/b435/th/pre/f/2015/089/8/f/how_to_make_a_cg_shot__part_1__the_camera_by_harroldsheep-d8dx61n.png) Part [2]
Part [2] :origin()/pre11/5d17/th/pre/f/2015/089/b/6/how_to_make_a_cg_shot__part_2__the_storyboard_by_harroldsheep-d8n8cvc.jpg) Part [3]
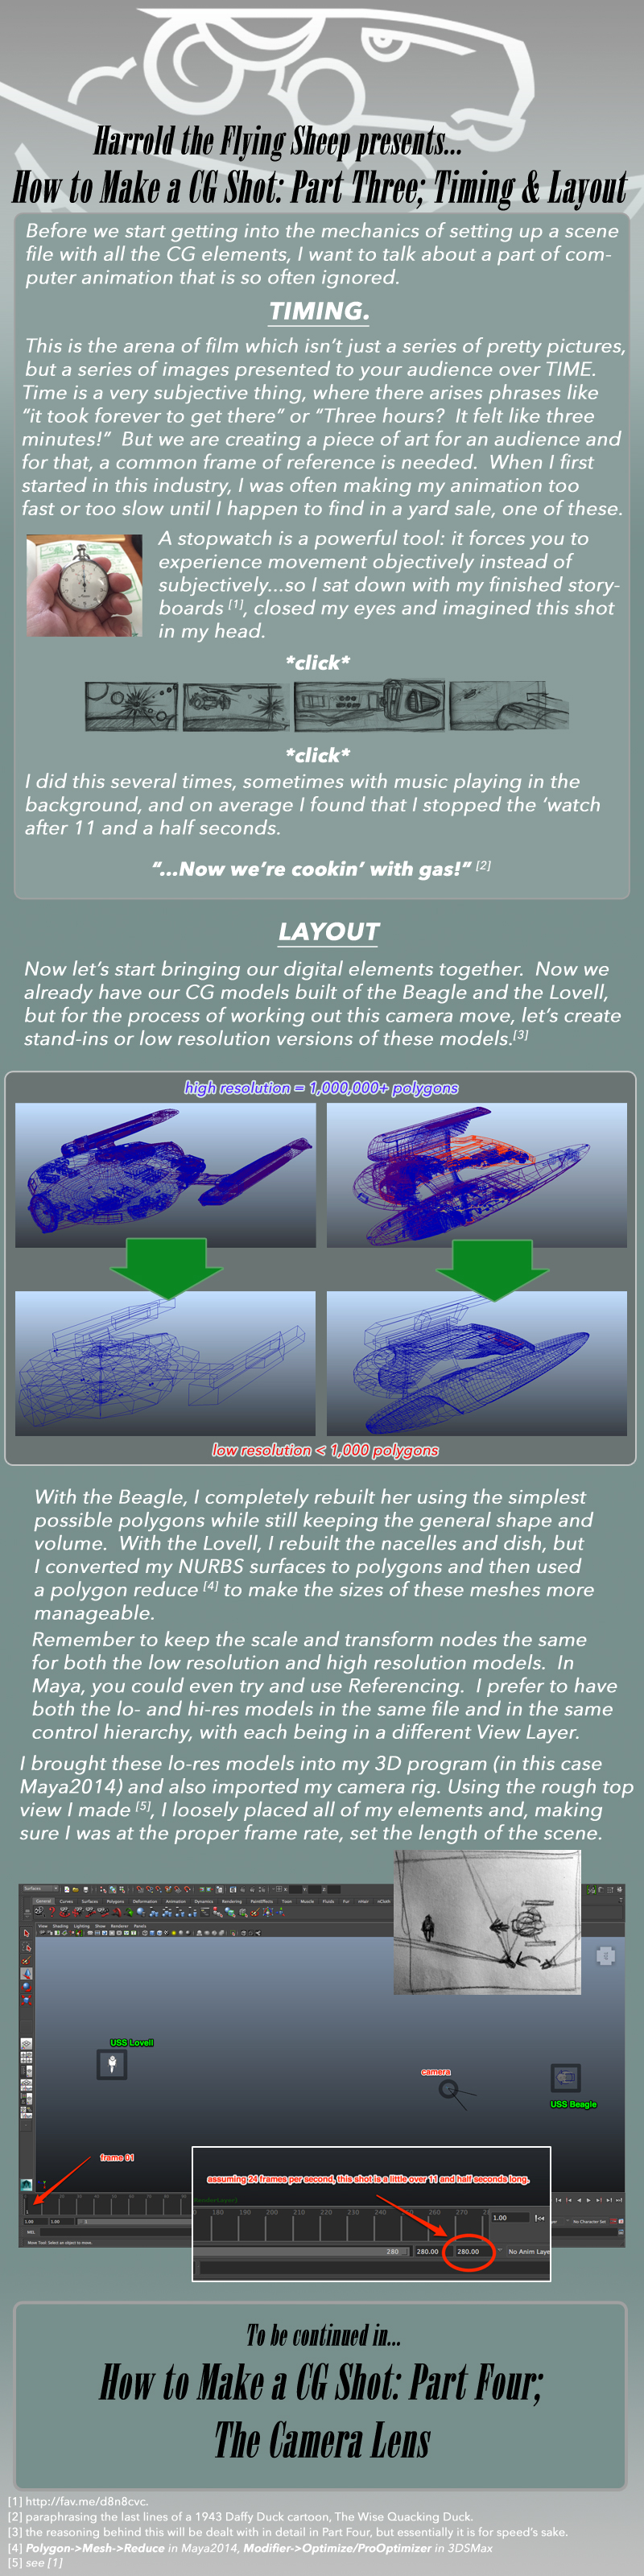
Part [3]:origin()/pre07/0cd6/th/pre/f/2015/112/f/5/how_to_make_a_cg_shot__part_3__timing_layout_by_harroldsheep-d8nrnt0.jpg) Part [4]
Part [4]:origin()/pre12/1848/th/pre/f/2015/112/c/8/cgtut_04_by_harroldsheep-d8qn4a9.jpg)
[EDIT: added a footnote in the high to low resolution model section...thank you Mann-of-LaMancha]
next up: Part Four, the Camera Move
first posted on my Patreon Page...be a supporter and get this, plus more WIPs, early releases on art works and tutorials, and exclusive content!
[EDIT: added a footnote in the high to low resolution model section...thank you Mann-of-LaMancha]
next up: Part Four, the Camera Move
first posted on my Patreon Page...be a supporter and get this, plus more WIPs, early releases on art works and tutorials, and exclusive content!
Image size
800x3200px 1.3 MB
© 2015 - 2024 harroldsheep
Comments10
Join the community to add your comment. Already a deviant? Log In
I get the timing stuff, but you lost me on high and low resolution. Specifically; why? You've, more or less, explained each element in previous instructions, Either explicitly explaining "Why" or addressed indirectly why each element was necessary. This, it felt like you left it dangling. I imagine the next installment will address 'why', but it would have been nice to prep for the explanation with a foreword about it, then go into it in detail in the next one.
If I had to guess, I'd imagine that the low resolution might be used for distance shots where all the detail would be lost anyway. Personally I don't like guessing during a tutorial.
If I had to guess, I'd imagine that the low resolution might be used for distance shots where all the detail would be lost anyway. Personally I don't like guessing during a tutorial.